Obligation receipts and how to transfer borrower rights on NFTfi
December 01, 2022 ・ 5 min read
An obligation receipt allows its holder to exercise the right to get the NFT asset back once the loan is repaid, and borrowers can now transfer or sell it.
⚠️ WARNING: This feature is not yet officially supported. Users use the below instructions at their own risk. NFTfi will not provide any (e.g. Discord) user support/guidance related to obligation receipts!
What is an obligation receipt?
When a borrower takes out a loan on NFTfi, they must put down their NFT as collateral. Borrowers receive the loan principal from lenders, and lenders get promissory notes, giving them the right to receive the respective loan collateral NFTs in case of a loan default. The counterpart to the lender’s promissory notes are called obligation receipts — and govern borrower rights. Borrowers (specifically: the wallet they took out the loan with) have the right to get their collateral NFTs back upon full repayment of the loan principal plus interest. If a borrower wants to transfer this right to a new wallet or sell it to someone else — e.g. if he can’t repay the loan but wants to avoid default and monetize at least some of the collateral’s surplus value — he can now do so by optionally minting an ERC-721 obligation receipt NFT.
How to mint an obligation receipt?
To transfer the borrower’s rights to a new wallet, one must manually mint an obligation receipt on an active loan and then transfer this newly minted NFT to the new wallet. The obligation receipt will then allow its new holder to receive the collateralized NFT upon loan repayment from that wallet.
It does get a bit geeky here, but this is how to mint an obligation receipt:
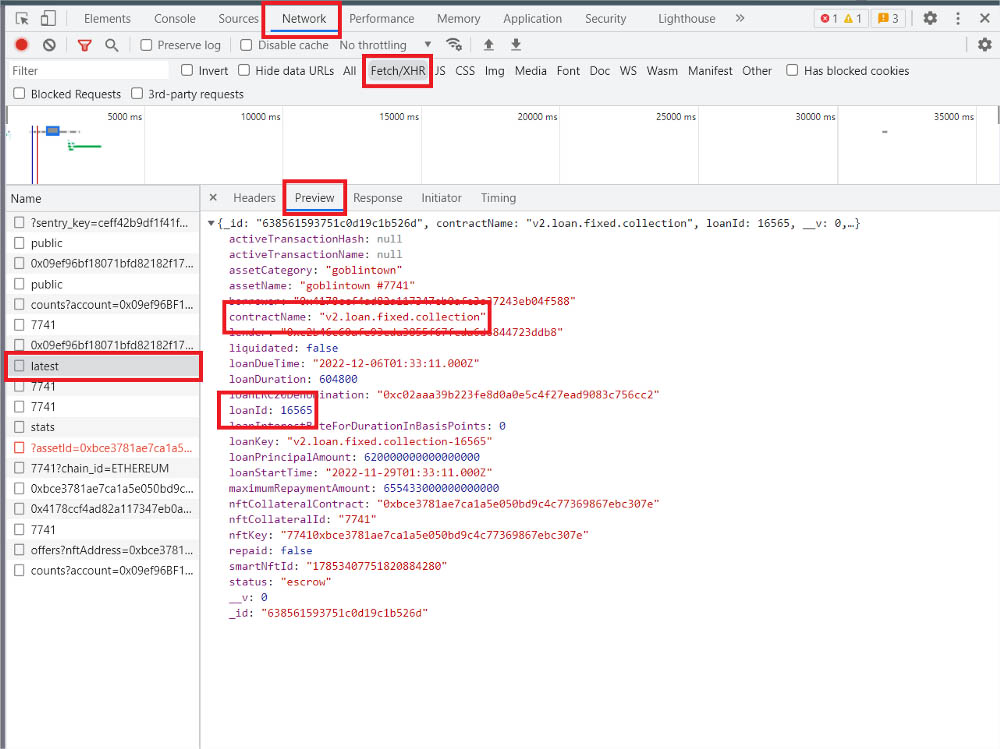
Get the “loanId” of the loan:
- Navigate to https://app.nftfi.com/ and open the asset page (an asset that is in escrow).
- Open browser dev tools (press F12 on Chrome), navigate to the “Network” tab, and then refresh the page.
- Find the “loanId” value in the JSON response of “/latest” network call, and take note of the “contractName” which will come in handy in the next step.
Mint the obligation receipt on Etherscan:
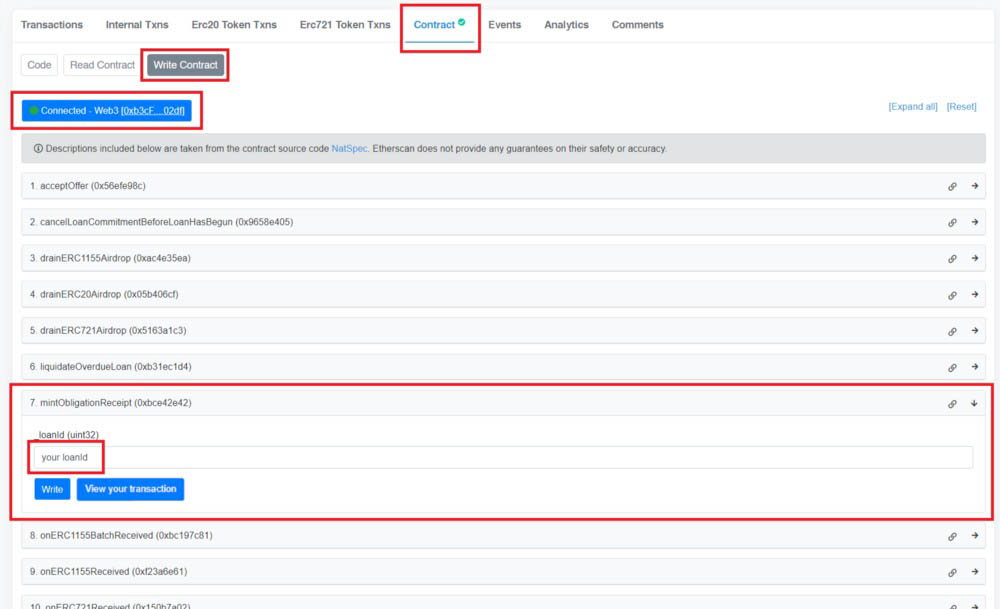
- Navigate to the relevant NFTfi smart contract on Etherscan by choosing the correct smart contract:
“V2.loan.fixed-xxx” — for loans started before October 21, 2022: https://etherscan.io/address/0xf896527c49b44aab3cf22ae356fa3af8e331f280
“V2–1.loan.fixed-xxx” — for loans started on or after October 21, 2022: https://etherscan.io/address/0x8252df1d8b29057d1afe3062bf5a64d503152bc8
“v2.loan.fixed.collection” — for loans started using a Standing Collection Offer: https://etherscan.io/address/0xe52cec0e90115abeb3304baa36bc2655731f7934
- Ensure your Web3 wallet is connected.
- Choose the “Contract” tab, then click “Write contract” below, and then select the “mintObligationReceipt” option.
- Enter the “loanId” you got in step 1.
- A MetaMask (if you are not using MetaMask, some other wallet) window will pop up. Accepting the pop-up will initiate the contract interaction and mint the obligation receipt. Once the transaction is complete, the Etherscan page will prompt you to “View your transaction.”
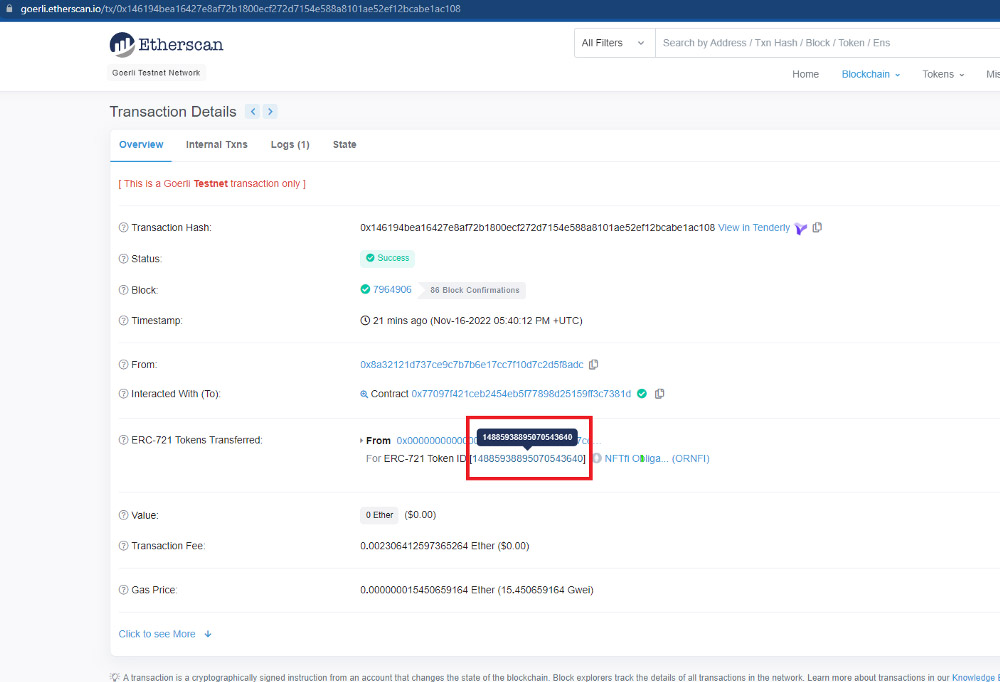
- Click “View your transaction” and save the tokenId (see image below), which you’ll need in the next step.
How to transfer the newly minted obligation receipt?
Transfer the newly minted obligation receipt to a new wallet:
- Navigate to the NFTfi Obligation Receipt contract on Etherscan:
https://etherscan.io/token/0xe73ECe5988FfF33a012CEA8BB6Fd5B27679fC481#writeContract
- Choose the “Contract” tab, then click “Write contract,” and then select the “safeTransferFrom” option (7).
- Insert the following into the respective fields: “From” wallet address, “To” wallet address, and tokenId (as shown in the previous section).
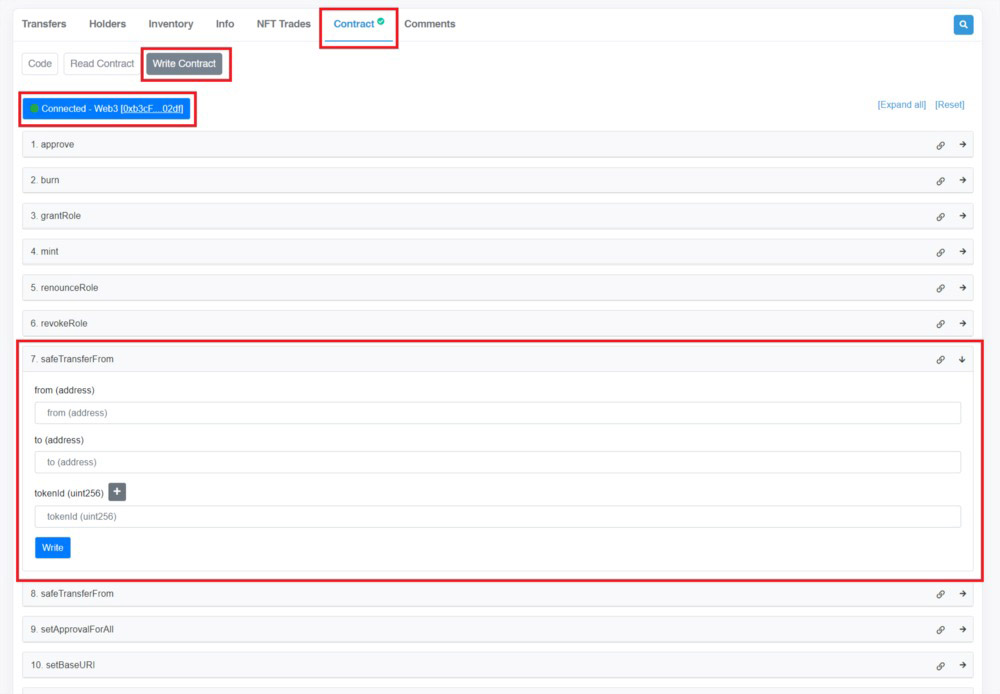
- Click the “Write” button, and you will initiate the transaction.
Et voilà, the new holder's wallet of the obligation receipt will now be able to pay back the loan and receive the loan collateral!
How to repay the loan (if holding an obligation receipt) via Etherscan?
Currently, our dApp UI does not support repaying the loan with the obligation receipt, so the holder of the obligation receipt must use Etherscan.
Here is the process for repaying the loan via Etherscan:
- Click on this link (if your contract is with V2 and the loan was made before October 21, 2022): https://etherscan.io/address/0xf896527c49b44aAb3Cf22aE356Fa3AF8E331F280#writeContract
- Click on this link (if your contract is with V2 and your loan was made after October 21, 2022): https://etherscan.io/address/0x8252Df1d8b29057d1Afe3062bf5a64D503152BC8#writeContract
- Click on this link (if your contract is for loans using a Standing Collection Offer): https://etherscan.io/address/0xe52cec0e90115abeb3304baa36bc2655731f7934#writeContract
- If your contract is still V1, click here: https://etherscan.io/address/0x88341d1a8f672d2780c8dc725902aae72f143b0c#writeContract
- Connect your wallet and put the loan ID in the ‘payBackLoan’ field. Please refer to the first step above on how to get the “loanId.”
- The contract will know what you owe, so the next step will be a pop-up from MetaMask, which will ask you to confirm the transaction. This will then take money from your wallet and pay back the loan for you, and the asset will be transferred to your wallet.
—
If you have any questions, don’t hesitate to reach out in the #support channel in our Discord, and make sure you follow us on Twitter for updates.
Discord | Twitter | Join the Ambassador program
This article is for educational and informational purposes only and should not be considered financial advice. Conduct your own research and due diligence before making any investment or financial decisions, such as when considering novel products including NFT loans.

October 08, 2024
NFTfi Aggregator: Your NFT Lending Command Center Is Live
NFTfi V3 is the best version of your favorite NFT lending protocol. The highlight of this protocol upgrade is the introduction of Flexible Loans. Now, borrowers can choose a new loan type called “Flexible Loan.” Under flexible loans, they only repay the prorated interest instead of the full interest, as they did before. In other words, borrowers will have the option to pay only for the interest they use.
Learn more >
October 08, 2024
NFTfi V3 is here! Flexible Loans and More
NFTfi V3 is the best version of your favorite NFT lending protocol. The highlight of this protocol upgrade is the introduction of Flexible Loans. Now, borrowers can choose a new loan type called “Flexible Loan.” Under flexible loans, they only repay the prorated interest instead of the full interest, as they did before. In other words, borrowers will have the option to pay only for the interest they use.
Learn more >
July 30, 2024
Improved Underfunded Offers
We have significantly enhanced the loan offer functionality on NFTfi, allowing lenders to make offers even when they do not have sufficient funds in their wallets. This improvement helps lenders boost their capital efficiency and save time, especially when refinancing a loan.
Learn more >